
DuraSport rocker panels are made of durable and paintable TPO plastic resin with an automotive grade clear coat finish. For adhesion to your vehicle, high quality chemical resistant 3M double back adhesive is used for prolonged durability. DuraSport Rocker panels are designed for flexibility and ease of installation. Simply select the color pattern you like, what height panels you want, (4”, 4.5”, 6”, 6.5”) and if you have a long box or super duty length vehicle or a standard short box length vehicle. If you have the long vehicle, order the 6 piece set and other standard length vehicles use a 5 piece set. The kit is designed for cut to fit installation and has 2 pattern material pieces included.
Product Kits:
5-piece Standard Kit
Includes: 5 piece set of panels and 2 pattern material pieces.
- 4” - $235.99
- 4.5” - $235.99
- 6.5” - $249.99
6-piece Super Crew/Long Box
Best for long box or super duty length vehicles. Includes: 6 piece set of panels and 2 pattern material pieces.
- 4” - $278.99
- 4.5” - $278.99
- 6.5” - $292.99
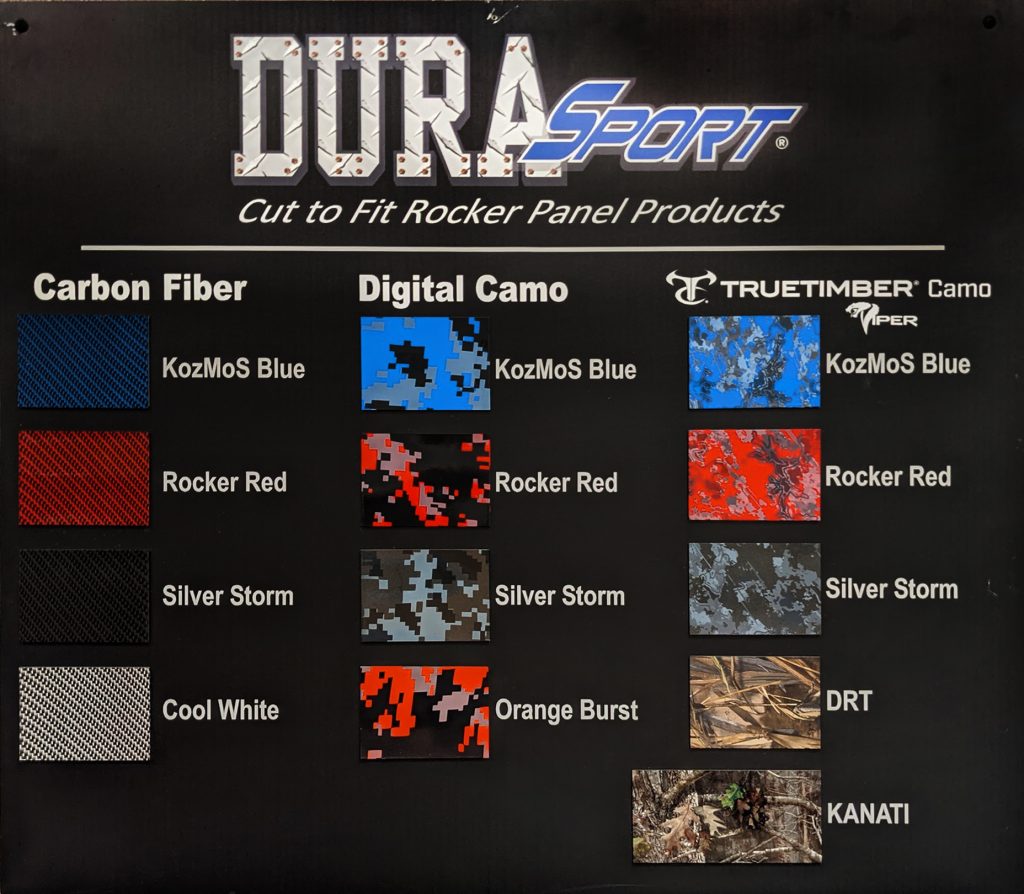
Color and Pattern Options:
Installation Instructions
The first step is to determine where on your vehicle you want to mount the rocker panels. Use a styling line or a body feature that you will line up with. Using masking tape, place the tape the full length of your vehicle to determine the top edge placement of your rocker panels and to determine a straight line. For added assurance, you can also use a string to the check the straightness.
Make a diagram of each of the panel pieces your vehicle will require. Measure the approximate length for each piece on your vehicle. Then using that information, determine which panel pieces should be cut from the 54” kit pieces.
This step is important so you get all the required pieces to complete your vehicle.
In the third step, you use the pattern material provided in the kit. Starting with the longest panel required, use masking tape to hold the clear pattern material in place. Using a marker, trace both ends of panel so the trim line matches the shape of your vehicle feature. The rocker panel should be approximately 1/16” – 1/8” short of the body panel length. Remove the pattern material from the vehicle and using a good quality scissors, cut the pattern material along the marked area. Place the pattern material back onto the vehicle to verify fit and adjust if needed. I like to label the pattern pieces as to which body panel they belong with. Labeling the adhesive backing material in the same manner when you cut the completed part is also helpful.
In step four, after verifying the fit of the pattern piece, place the completed pattern over the rocker panel cover and mark both ends. Using a scissors, cut the panel to the correct shape and size. Hold the cut piece up to the vehicle to double check the fit. Now using the same pattern, mark a second rocker panel cover piece for the other side of the vehicle. Make sure to orientate the part correctly so that you have a left hand and right hand piece when you are done. Measure twice and cut once.
Moving to the second longest vehicle panel, use the same pattern piece to mark the required shape and length for the next rocker panel piece using the same approach as in STEP 3. When fit has been verified repeat STEP 4 for the next piece.
Repeat STEPS 3, 4 and 5 for the remaining pieces required. Make sure you have the material lengths remaining to get all the required pieces for your vehicle before you make your final cuts.
Now for the seventh and final step, installing panel pieces:
Using a good quality degreaser, clean the areas of the vehicle that the panels are to be installed.
Take the first panel you are installing and hold it up to the vehicle to get a good feel for how the panel will be fit to the vehicle. Remove the red backing material from the adhesive. Place the panel to the vehicle in the desired position. Once the part is in place, use firm pressure, to press the part tight to the vehicle.
The panel has pressure sensitive adhesive and must be pressed firmly to get optimal adhesion to the vehicle.
Repeat these installation steps for each piece. For longer pieces, you may want to use two people for installation. To make sure the adhesive provides optimal performance, I like to use a roller to cover the parts thoroughly.